The image direction playbook
Stop guessing what to type. A practical guide to the labels that turn an idea into an image — and give you more control over the result.
By Vivi
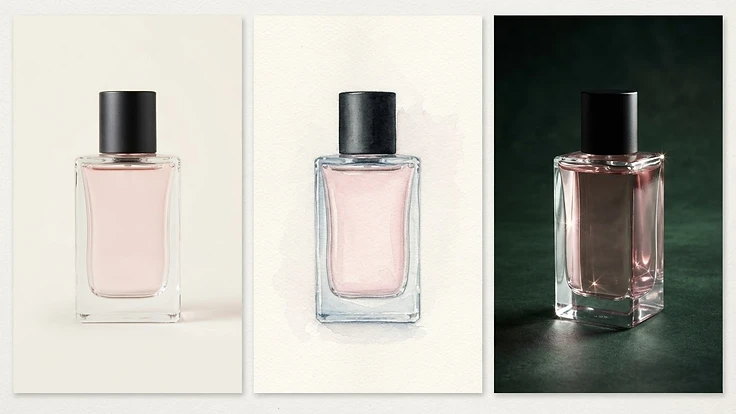
Turn an idea into image direction
A practical guide to choosing what to create, how to show it, and what to change.
Start with the image’s purpose, then choose its view and appearance. Add labels or editing instructions when needed.
Five decisions you can make
| Main category | Your decision |
|---|---|
| Image Type & Purpose | What kind of image will communicate my idea? |
| View & Composition | What should the viewer see, and from where? |
| Style & Appearance | What should it look and feel like? |
| Information & Callouts | What should the viewer learn from labels or measurements? |
| Editing & Enhancement | What should change in an existing image? |
Add your reusable label reference
- Save image-generation-labels.md in your project folder alongside your image references. It contains the complete reusable collection of labels and descriptions.
- Make the file available to your AI tool. If it can read your project folder, point it to the file. Otherwise, attach the file to the conversation or add it to the project's reference files, where supported. A file saved on your computer is not automatically available to the AI.
- Ask the AI to read it before using the labels:
Read image-generation-labels.md and use its descriptions
to interpret the slash labels in my image prompts.
Combine the selected labels with my written instructions.
If you cannot access the file, tell me so I can attach it.
Keep the file in your project for reuse. In a new conversation or project, make it available again and repeat the instruction as needed.
Use the labels in a prompt
Subject + image type + view + appearance + specific details.
/productphoto /frontview /glass /minimalist

Create a clear rectangular perfume bottle with pale pink
liquid and a matte black cylindrical cap. White background,
soft studio light, subtle shadow. Show the whole bottle.
Square image. No text, logos, or props.
About the slash labels: They are shorthand defined in the reference file, not universal built-in commands. They do not enable image generation in a tool that lacks it; you can still use the definitions to draft a prompt for an image generator.
Start small: Choose one image type and a few compatible modifiers. You don’t need a selection from every category.
Image Type & Purpose: Present a product or explain its form
Choose what the image needs to do before choosing its style.
Product & commercial imagery
Use this family for product pages, campaign concepts, catalogs, and brand presentations.
Spotlight: /productphoto
Make the product easy to assess. Describe the setting, lighting, framing, and details that must be visible.
/productphoto /whitebackground

Using the attached perfume bottle as the reference, create
a clean catalog photograph. Preserve its shape, pale pink
liquid, and black cap. Show the whole bottle against white
with soft lighting and a subtle shadow. No props or text.
More commands: /studiophoto — controlled studio setup; /catalog — clean catalog presentation; /ebay — listing-style product image; /whitebackground — plain white setting; /lifestyle — product in an everyday setting; /hero — product as the main visual focal point.
Technical drawings
Use this family to explore shape, construction, or a technical visual language.
Spotlight: /blueprint
Turn the subject into a drawing that emphasizes form and structure.
/blueprint

Using the same bottle reference, create an engineering-style
concept drawing with fine white lines on deep blue. Show
the exterior silhouette, cap, and visible spray tube.
No measurements or invented internal components.
More commands: /technicaldrawing — precise-looking line drawing; /schematic — simplified system connections; /patent — vintage patent-drawing treatment; /cad — CAD-style rendering; /wireframe — edges and underlying geometric structure.
Choose by purpose: Product imagery helps someone assess or desire the object. Technical imagery helps someone inspect its form or understand a proposed design. A technical appearance alone does not establish engineering accuracy.
Image Type & Purpose: Explain parts, steps, and differences
Match the image structure to what someone needs to understand.
Assembly & procedural instructions
Use this family to explain what belongs together or what happens next.
Spotlight: /explodedview — show the parts
/explodedview /3drender

Create a concept image of a refillable perfume bottle with
its cap, removable spray assembly, and glass body separated
vertically in assembly order. Keep the parts aligned.
White background. No extra components or text.
Spotlight: /howto — show the sequence
/howto /lineart

Create three numbered panels showing how to refill a
concept perfume bottle with a screw-on sprayer:
1. Remove the cap and unscrew the sprayer.
2. Refill the bottle using a small funnel.
3. Screw the sprayer back on and replace the cap.
Keep the same bottle design throughout. Numbers only.
More commands: /assembly — parts fitting together; /disassembly — taking an object apart; /partsdiagram — component identification; /instructional — instructional image; /assemblyguide — construction steps; /repairguide — repair or maintenance steps.
Visual explanations & comparisons
Use this family to simplify information or make differences visible.
Spotlight: /comparison — show alternatives
/comparison

Using the bottle reference, show two versions side by side:
one with pale pink liquid, one with pale green liquid.
Keep bottle shape, cap, scale, view, and lighting identical.
White background. No text.
More commands: /diagram — explain relationships; /infographic — combine supplied facts and visuals; /diagrammatic — simplify into instructional shapes; /beforeafter — show an original and its changed state.
Be specific: Supply the parts, steps, facts, or comparison criteria. For a real object or procedure, provide accurate references.
View & Composition: Decide what the viewer sees
Change the view to reveal a different aspect of the same subject.
Viewpoints & framing
Spotlight: /frontview vs. /topdown vs. /macro
A front view shows the overall silhouette. A top-down view reveals the object from above. A macro view brings a small surface detail into focus.
Using the attached perfume bottle as the reference, create
one image with this direction: [INSERT VIEW]. Preserve the
bottle design, materials, and pale pink liquid. White setting.

/frontview: Show the whole bottle straight-on at bottle height.
/topdown: Look directly down at the upright bottle and cap.
/macro: Fill the frame with the lower glass corner, showing
the thick glass edge, pink liquid, and fine reflections.
Run each view as a separate prompt, selecting one direction.
More commands: /rearview — back; /sideview — side; /lowangle — view from below; /perspective — depth and foreshortening; /orthographic — aligned front, side, and top views; /isometric — parallel-edge three-dimensional view; /360view — specify a sequence of views around the object; /closeup — tighter framing; /detail — focus on a named feature.
Internal structure views
Spotlight: /cutaway vs. /ghosted
Use /cutaway to remove a visible section of the exterior. Use /ghosted to keep the exterior outline while making it partly transparent.
Using the supplied pump reference, create a [cutaway / ghosted]
concept view of the perfume bottle’s spray assembly. Reveal
only the documented components. Keep its overall shape clear.
More commands: /crosssection — a slice through the object; /transparent — see through its exterior; /xray — X-ray-style internal view.
Be specific: “360 view” needs a defined output, such as eight still views at 45-degree intervals. The label alone does not specify an animation or interactive viewer.
Style & Appearance: Choose the medium and mood
Style controls the visual language. Mood controls how the image feels.
Rendering & realism
Spotlight: /3drender — a polished rendered treatment with deliberate materials and lighting.
More commands: /photorealistic — photographic appearance; /realistic — believable proportions, materials, and lighting.
Illustration & art styles
Spotlight: /watercolor — translucent washes, pigment variation, and paper texture.
More commands: /lineart — clean outlines; /sketch — loose hand drawing; /pencil — graphite marks; /ink — ink lines and fills; /oilpainting — painted texture and brushwork; /comic — comic-book treatment; /cartoon — simplified expressive illustration; /anime — anime-inspired treatment.
Aesthetic, mood & color treatment
Spotlight: /cinematic — lighting, framing, and atmosphere directed like a film image.
More commands: /vintage — aged appearance; /retro — a specified past era’s visual language; /minimalist — reduced visual clutter; /dramatic — strong lighting and contrast; /moody — dark atmosphere; /neon — vivid luminous lighting; /blackandwhite — grayscale; /monochrome — one hue with tonal variation; /stylized — deliberately interpreted forms.
Try three visual directions
Using the perfume bottle reference, preserve its silhouette,
black cap, pale pink liquid, front view, and centered placement.
Apply one treatment:

/3drender: Polished 3D rendering with soft studio light and
a clean white background.

/watercolor: Delicate watercolor on white paper, with visible
pigment variation and softly painted glass reflections.

/cinematic: Photographic treatment with directional side
lighting, a dark background, and restrained highlights.
Choose deliberately: Start with one medium. Add mood or color instructions that support it. When combining styles, explain their relationship: “watercolor fills with clean ink outlines.”
Style & Appearance: Direct materials and surface condition
Name the material, then describe how its surface behaves.
Materials & surface condition
Spotlight: /glass
Describe transparency, thickness, tint, and reflections. “Glass” could mean clear, frosted, tinted, or textured.
Spotlight: /metals
Describe the finish: brushed, polished, matte, or hammered. Finish changes how highlights behave.
Spotlight: /worn
Describe where wear appears and how much. Light edge scuffs and deep scratches tell different stories.
Try one material change at a time
Using the perfume bottle reference, change only its cap.
Keep the cap’s shape, bottle, liquid, framing, background,
and lighting consistent. Apply one treatment:

/glass: Clear colorless glass cap with visible thickness
and realistic refraction.

/metals: Brushed silver metal cap with fine vertical grain
and soft metallic highlights.

/worn: Original matte black cap with subtle scuffs at the
top rim. Keep the rest of its surface intact.
More commands: /texture — emphasize a named surface pattern; /material — specify a material and finish; /plastic — specify matte, glossy, translucent, or another plastic finish; /rust — add corrosion to an appropriate metal surface.
Make the instruction local: “A brushed silver cap” identifies the surface to change. “Make it metallic” can leave the target unclear.
Material is different from lighting: Brushed metal is a surface instruction. A bright edge highlight is a lighting instruction. Describe both when they matter.
Information & Callouts: Make the image explain itself
Add information that helps someone identify, understand, or measure.
Labels & annotations
Spotlight: /labelled — name the part
/labelled

Using the perfume bottle reference, add exactly three labels:
“Cap”, “Spray tube”, and “Glass body”. Place labels outside
the bottle with thin leader lines to the correct parts.
Keep the photograph unchanged and all text easy to read.
Also available: /annotated — explain a feature or action with a note and arrow. For example, an arrow to the spray tube with “Draws liquid toward the pump.”
Dimensions & measurements
Spotlight: /dimensioned — state a supplied size
/dimensioned /technicaldrawing

Draw the bottle concept in front view. Use these fictional
design specifications: overall height including cap 120 mm;
maximum body width 60 mm. Add dimension lines with the exact
labels “120 mm” and “60 mm”. Include “Concept dimensions”.
Do not add other measurements.
Also available: /measurement — emphasize supplied scale or measurement information. State the units and any reference object explicitly.
Choose the right layer: A label says what something is. An annotation explains it. A dimension states its size.
Check before sharing: Confirm spelling, leader-line targets, units, and values. Dimensions must come from supplied specifications or measurements; an image cannot establish an object’s real size by appearance alone. Use drawing tools to verify scale when precision matters.
Editing & Enhancement: Refine with a clear change request
State what changes, where it changes, and what must stay consistent.
Content changes
/edit — general modification; /remove — delete an element; /replace — substitute a named object or area.
Color, background & lighting changes
Spotlight: /recolor — change a specific color.
/recolor

Change only the perfume liquid from pale pink to pale green.
Keep the bottle, cap, liquid level, camera angle, lighting,
reflections, and background unchanged.
Spotlight: /relight — change the lighting.
/relight

Using the original pale pink bottle image, change the soft
studio lighting to warm directional light from the left,
with a longer shadow to the right. Preserve the bottle,
cap, liquid color, camera angle, and white setting.
Also available: /background — change the setting behind the subject.
Restoration & cleanup
/restore — repair damaged or degraded imagery; /cleanup — remove clutter or imperfections; /retouch — make subtle photographic corrections.
Quality enhancement
/enhance — improve overall clarity and presentation; /upscale — request larger output with finer apparent detail. Specify the desired output size. Added detail may be inferred rather than recovered.
A repeatable workflow
- Generate a base image with a clear subject and purpose.
- Choose a version to use as the reference.
- Change one decision at a time.
- Compare the result against the reference, including details you asked to preserve.
Useful editing formula: “Change only [element] to [desired result]. Keep [specific details] unchanged.”
The image label library
185 reusable labels. Five categories. Find a direction, copy a label, and make it your own.
/productphotoCreates a professional product photography image.
A little direction goes a long way.
Thanks for reading. Keep experimenting.
— Vivi